In this short online course, you will learn everything a beginner needs to know about pastels. Pastels are an easy art form to get started with, and you can easily get a beautiful result. However, mastering the delicate colors fully requires practice.
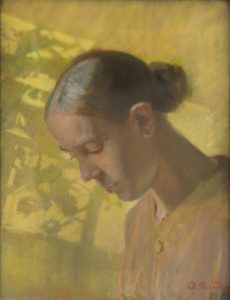
Image: Study for the Head of the Girl, Anna Ancher, 1890
What is pastel chalk?
Pastels are also called soft pastels and dry pastels. Many artists just say pastel, and we all know what they mean. But pastels are quite different (see later). There are differences in how hard pastels are, so not all of them will be called soft pastels.
Pastels probably get their name from the fact that they are very discreet in color, which shines through the white paper like watercolor. By fixating between layers, you can achieve many layers of pastels, which give a darker shade of color. To achieve depth in the picture, you have to work with it in several passes.
… pastels are soft crayons that release their color easily. They consist of soft, very finely ground minerals such as kaolin, gypsum, talc or clay that are mixed with the necessary coloring agent and just enough binder to hold the powdered substances together as a whole.Quote: Wikipedia
The difference between pastel chalk and oil pastel
Pastel chalk gives an effect like blackboard or street chalk, but can be smoothed and give a consistent surface. It is transparent and shimmering, but always dry. Oil chalk can give an intense and full-bodied surface, which can become almost shiny as if it were damp.
Both pastels and oil pastels are good at mixing – but not with each other. If you want to draw mixed media with the two techniques, you need to fixate a lot between the layers.
Some call both types of pastel soft pastel.
Warning about dry pastel
Pastels produce a lot of dust while working, so artists with asthma or other lung problems are advised to be careful when using this technique, as the dust can be inhaled.
Equipment for soft pastel:
- Pastel chalk
- Pastel paper or watercolor paper
- Fixative
- Drawing stub
- Kneading rubber
- Masking tape
Which brands can be recommended?
When it comes to pastels, it’s really important to buy the right ones. The brands that can be bought for children often have very little pigment or very large particles in them, so the result will be poor.
Pastels I recommend:
- Gallery
- Rembrandt
- Faber-Castell
- Polychromos (is a hard pastel that is high quality, but expensive)
- Sennelier
- Koh-I-Noor
Most brands come in nice boxes, but can also be purchased individually so you can make your own set. The brands can be mixed together, so you don’t have to buy them all from the same manufacturer. Polychromos has actually been taken over by Faber Castell, but is still produced.
Unfortunately, pastel chalks are not cheap anymore, but remember that you can mix your way to most colors. So just start with the primary colors, black and white – and see if that’s something you’re drawn to.
Paper for dry pastel
You can use watercolor paper or buy the special paper for pastel called pastel mat. In my opinion, it makes no difference. You can also practice on cheap writing paper, but the pastels stick best on a soft paper with a slightly to very rough surface. If you want to save your drawing, you should not use writing paper, as it cannot be fixed properly.
Also try the pastels on the delicious but cheap cardstock paper, and see what an incredible difference it makes that the paper has a color.
The “real” pastel paper has a surface that resembles very fine sandpaper. In this way, the paper helps to release pigment, which is easily absorbed into the small surface particles provided by the rough paper structure.
What is a fixative?
Fixative, as the name suggests, ensures that the chalk does not drip off the paper or smear if you touch it. With pastel chalk, it is an indispensable product. A spray can of the product seems expensive, but it lasts a very long time.
There are several brands of fixative, but I only have experience with the one called “Krystalklar Fixativ”. It can definitely be recommended. It dries clear and does not turn yellow over time.
Fixative technique:
NOTE: An incorrect fixative technique can cause pastel to blow off the paper, which was actually stuck on.
- Preferably mount your drawing on a wall or other vertical surface (this way it is easiest to dose without the spray bottle making splashes.
- Spray briefly from a distance of at least 20 cm in a smooth motion, so that the fixative is spread over the entire drawn area.
- Let it dry and repeat several times. Many small layers work much better than one large one that risks running.
Fixative is very often added when we draw with pastel chalk. The paper has a limit to how much chalk can bind to it, and subsequent layers will simply settle on top like dust.
What is a drawing stub?
A drawing stub is a drawing tool that looks a bit like a pencil without the tip. It’s a hard rolled paper that’s sharpened. It can actually be sharpened with a good pencil sharpener, which is handy when it starts to get too full of color.
The drawing stub adds a soft expression to the drawing, which is very nice and sensitive.
Drawing stub technique
- Draw with the color or colors you want (without fixing)
- Rub on top of the color or colors so that they stretch and are worked well into the paper
- Fix the color when you are satisfied.
Alternatives to drawing stubs
- Use a finger
- Use regular cotton wool
- Use a hard rolled round
The drawing stub has the advantage that it is pointed and can therefore be used for relatively precise areas in the drawing. However, you can practice and get a precise expression from a tightly rolled cotton pad.
Kneading rubber
You can’t erase dry pastel, but you can dab a little pigment on it with a kneadable eraser. That’s why I recommend you buy one. It’s not crucial to the result, but it’s a handy tool to have. They can be had relatively cheaply – around 20,- is normal, so don’t skimp here.
Masking tape
In real art supply stores you can buy some tape, which is absolutely brilliant if you want to leave areas completely white. It can be left on while you fix the drawing and carefully pulled off without tearing the paper. A roll is a bit expensive, but it lasts a very long time.
A clever trick is to cut the tape with a hobby knife with a so-called rotating blade. This way you can cut the tape in the shape of what you want to leave white. It’s easiest to cut while it’s stuck to the paper, as long as you don’t press too hard.
When you are finished with your drawing before the final fixation, simply peel off the tape. It may help to use your hobby knife to lift the first part if, like me, you don’t have good nails.
Pastel chalk technique
Layers and shading techniques
As mentioned several times, it is normal to apply the pastels in several layers. However, you can also get great effects by applying them loosely in a broad slanted shading.
However, it is not normal to follow a particular direction in your strokes, as they are no longer visible after using a drawing tool (finger or cotton swab).
In the drawing at the top of this post, you will see the strokes from the colors clearly in some places, while they are blurred in others. This combination of techniques is a big part of the art – along with of course the general understanding of drawing. We will cover that in another post at another time.
Pastel dust
When drawing with pastel it is important not to press hard as this will just generate a lot of dust that will not stick to the paper. Press as if it were a pencil and let the colour slide across the paper.
You can see the amount of loose dust when no more can be added. Then you need to fix and draw on top again.
Start with large blocks of color
Pastel is very suitable for applying to both large surfaces, where you draw with the long side of the chalk, and then afterwards apply smaller details with the end of the pastel chalk. You will see that some manufacturers produce square
You can go back and remove the chalk with the kneading rubber, and you can put a lighter color on top of the dark. Possibly by putting a layer of fixative in between so the colors don’t mix.
Strong or dusty colors (make a new pastel out of dust)
The dusty colors in the pastel are achieved by working them with the drawing stub, finger or cotton ball after application. If you want strong colors instead, you can keep applying the same color without rubbing it out. It will create a lot of dust, but you can actually collect the dust and make new chalk out of it by simply adding a little water and shaping it with your fingers and letting it dry.
Famous artists who have drawn with pastels
When I think of pastel chalk, I immediately think of the Skagen painter Anna Ancher , who is also allowed to stand for the picture in this post. Anna Ancher probably took the technique seriously, as the first in Denmark in the 1870s. The way the light is expressed in the dry pastel is a fantastic fit for the sensitive expression Anna Ancher also has in her paintings.
Other painters have primarily used dry pastel for studies and as a model for oil paintings.
Other great artists who have used the pastel chalk technique include:
- Edgar Degas
- Pablo Picasso
- Odilon Redon
- Edouard Manet
- Max Liebermann
- Asta Norregaard
Source:
Pirkko Mäkelä-Haapalinna

Pirkko Mäkelä-Haapalinna is a Finnish artist who works in a modern pastel technique. See the inspiring images on the website pirkkomakela.fi
Associations for pastel artists
There aren’t many communities in Denmark that practice pastel chalk, which is a bit of a shame.
Unfortunately, the technique has a somewhat tarnished reputation as a somewhat too feminine flower painting ala water color , which has however had a renaissance. I wonder if this will also soon come to dry pastel?
Abroad you will find:
- Pastel society of America (which accepts foreigners as well)
- Pastel Guild of Europe
Read also about the technique: Colored pencil
My past with pastel chalk
It was especially during my studies as an architect that I took up the pastel chalk technique. It is a fantastic way to make surfaces appear almost alive. For example, bricks are well illustrated in pastel chalk, which gives off the same naturally changing materiality. I can really recommend pencil drawing in combination with pastel chalk if you want to illustrate your emotional attachment and understanding of a project. It also works digitally photographed afterwards.