Here is ArtSchool.Nu’s online linocut course. With this step-by-step guide, you can create your own linocut poster, print cards for invitations, or produce artworks to exhibit and sell. Remember to number your prints – this helps buyers see which print number they own out of the total edition (the fewer prints, the higher the price you can charge). It also helps you track how your prints develop throughout the process.
Welcome to ArtSchool.Nu’s online linocut course! Through this tutorial, you can create stunning works such as a linocut poster, print handmade cards, or produce artworks for display and sale. One important detail is to number your prints so both your buyers can identify their print number in the total edition (fewer prints mean higher value) and you can follow the progress of your printmaking.
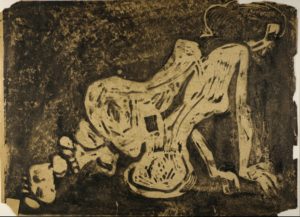
The image in this article is by William H. Johnson. Nude Recumbent, c. 1935–1938. Smithsonian American Art Museum.
What You Need to Make Linocut Prints
Linocut tools:
- Linoleum block (old-fashioned real linoleum flooring can be used)
- Cutting mat with corner guides
- Linocut carving tools
- Pencil
- Craft knife
- Fine sandpaper, grit 120 or finer
- Linocut ink
- Glass plate or tray for ink rolling
- Brayer (roller)
- Cloths and sponge for cleaning
You can buy a linocut starter kit in most craft stores and save some money that way. However, you don’t need much to get started. In fact, the only things you really need to buy are a roller and carving tools – the rest can often be found among your existing supplies or bought inexpensively in non-art stores.

What Is Linoleum?
Linoleum contains linseed oil – hence the name. The oil is pressed from flax seeds, then boiled and mixed with materials such as chalk, cork dust, stone and wood flour, resin, drying agents, and color pigments. It is mounted on burlap (a jute canvas), making linoleum a natural product.
Paper for Linocut Printing
Any absorbent paper can be used for linocut printing. Most people use good watercolor paper, but it’s also fun to experiment with thick, colored cartridge paper.
Remember that ordinary paper will warp if exposed to moisture (which is naturally present in the printing ink).
Ink for Linocut Printing
You can choose to buy inexpensive printing ink from a hobby store or invest in a professional-grade ink. However, you can also print with acrylic paint or any thicker paint or ink you already have on hand, as long as it can adhere to the roller.
How to Make a Linocut Print
The technique consists of five steps and some finishing work:
1. Cut the Linoleum Block to the Desired Size
Linoleum is easy to cut using a regular craft knife.
2. Draw Your Design on the Linoleum Block
Note: The block you work on is mirrored compared to the final print.
There are several ways to transfer your design to the linoleum block:
You can draw directly onto the block with a pencil, or you can transfer your design using tracing paper:
First, draw your design on tracing paper, then place it face down on the linoleum block. Trace over the lines on the back of the paper – this will transfer your original drawing (reversed) onto the block.
You can also create your design using one or more stencils if you’re not yet confident drawing freehand.
Finally, I recommend using a projector to cast your image directly onto the block.
3. Carve Out the Design
Everything you carve away from the linoleum block will remain blank in your print, as it won’t receive ink. You need to think in reverse compared to drawing – what stays on the block is what will appear in your design.
Always carve away from your body. Linocut tools are extremely sharp, even though they look small and harmless.

Keep the block placed on a cutting mat with corner guides so it stays in place while you carve. Otherwise, it will easily slide away from you. You can make your own cutting mat from a board with two wooden strips along the edges. The trick is to push the linoleum block into the corner formed by the two strips to keep it steady.
4. Sand the Block
Use sandpaper to remove burrs and loose material from your carving. This ensures that your print comes out clean and sharp.
5. Make a (Test) Print
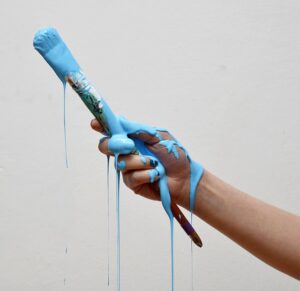
Pour some printing ink onto the glass plate and roll the brayer back and forth in the ink until it is evenly coated. Roll in different directions, and check for any “drops” of ink forming on the edges of the roller—these can create blotches.
Now roll the inked brayer over the linoleum block so that the ink covers all the raised surfaces you left uncut. Make sure no ink seeps into the carved areas.
I prefer placing the linoleum block face down onto the paper rather than laying the paper on top of the block. That way, I can press the block down against the table with my fingers. If you choose to lay the paper on top instead (which is easier), you’ll need to use a tool to press evenly—such as a rolling pin or, ideally, a printing press.
You can also use an additional glass plate as shown here, where the paper is likely laid on the block and a glass plate placed on top to create pressure for the transfer. Afterwards, the entire setup is turned over so the paper can be carefully peeled off to reveal the print.

Also note the inked glass plate in the background — this is the one used for rolling the ink evenly onto the roller.
Finishing
Hang the Print
Hang your print to dry. You can do this on a clothesline using clips that won’t leave marks on the paper — for example, binder clips or dull clothespins.
Tip: It doesn’t matter much where the image lands on the paper if you use a slightly larger sheet. You can simply trim the paper afterward to center the print perfectly.
Clean the Printing Block
As soon as you’ve made a print, clean the block thoroughly. After that, you can repeat the process using the same or different colors.
Linocut Multi-Color Printing
You can make linocut prints using multiple colors, but it’s a significantly more advanced process.
The easiest way is to roll several colors onto the block at once — though this won’t produce a precise result.
Typically, you’ll carve several separate blocks, each containing the part of the design to be printed in a specific color. The challenge is to align the already-printed paper precisely on top of the second or third block to ensure perfect registration.
Present Your Artwork
Once the print is completely dry, it can look beautiful when mounted in a mat (passepartout) or framed behind glass.
Feel free to share your artwork on social media with the hashtag #ArtSchool.nu.